How to Grow Daylilies
There are quite a few reasons why daylilies are called the perfect perennials! They come in a variety of colours, shapes and sizes. They also thrive in different climates, soils and water levels, being tolerant to droughts. Besides, they are almost disease- and pest-free. Since their blooming season ranges anywhere between June until frost, dedicating entire beds to those lovely showpieces is a great gardening idea!
Since there is no point in re-inventing the wheel, for a more complete discussion on the topics of plant parts, chromosome count, colour patterns and general description, please see the FAQ page of the American Hemerocallis Society.
Planting Time
This is probably one of the most FAQ at the farm. As far as we’re concerned, the plants we offer for sale have all been divided in the Spring. This allows them to fully recover for the Summer. If you purchase a plant from us, it will have its own fully developed root system. Because of that, the plant won’t even notice it’s been transplanted! You might lose a few feathers, but not the whole plant.
Spring Planting
Allows the plant enough time to recover and bloom the same year.
Fall Planting
First, you will receive bigger plants from us, grown an entire summer in our pots, with huge root systems.
Second, bugs shouldn’t bother you too much when planting!
Third, you can plant your favourite companion Spring bulbs around your daylilies. Once the bulbs foliage is dying back after blooming, your daylilies will cover them up. You can then maximize your space and produce a great and uninterrupted display of colours from one season to the next.
Division Techniques
We could be talking forever, trying to describe how to divide mature clumps. We’ve decided to take a few pictures, a step-by-step approach to clearly illustrate what we mean. Hope this will be useful. If you have further questions, don’t hesitate to write.
We prefer to divide in the Spring. Not too hot, not too cold! The plants are easier to handle, the leaves being just a few inches high. And as mentioned previously, it gives the new divisions a couple of months to get stronger and throw their own root system before the long and hot summer days.
Remember that going from a clump to a smaller division is quite a stressful event. The large root ball that was feeding the whole plant is now reduced to a smaller one. Watering heavily for a while will alleviate that stress and produce healthy-looking growths. Help with a high Nitrogen formula for a couple of weeks to produce great foliage. (Stop in June as too much Nitrogen prevents good blooming.)
Remember also to wear appropriate closed-toe footwear, gloves (especially when dealing with sharp objects), glasses, sun protection and a hat!
So, here are the simplified steps:
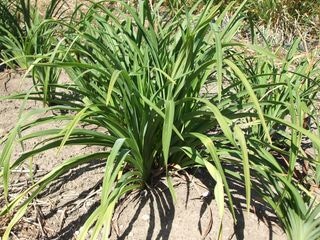
Step 1. Choose the clump that should be divided. This varies according to the goals of the gardener. Some like to keep small clumps, some like them big!
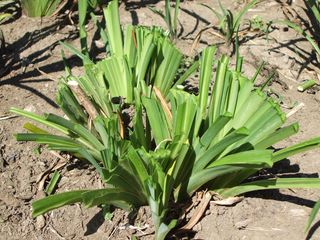
Step 2. If you’re dividing in summer, trim the foliage back to about 5 inches. The plant will be easier to handle and the water loss will be minimized after the division process is done.

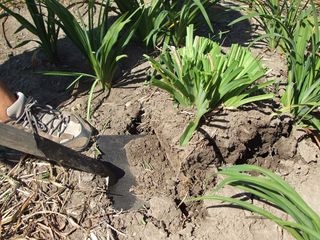
Step 3. Look at the plant and determine what side you’ll be digging it up from.
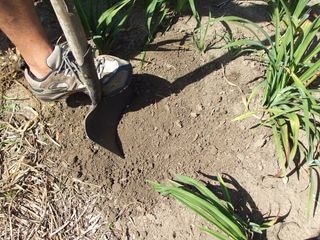
Step 4. Place the shovel in the ground, about 6 inches away from the outside growths. Most plants send their roots downwards but some send new growths and roots away from the plant, vertically. Yep, you might cut off a few roots or new growths, but that’s the way it goes!
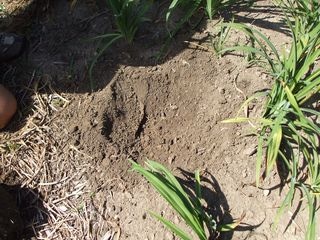
Step 5. Loosen up the soil around the roots. Since the tiny white roots are the ones responsible for the water uptake, the less you disturb them, the better and quicker the road to recovery.
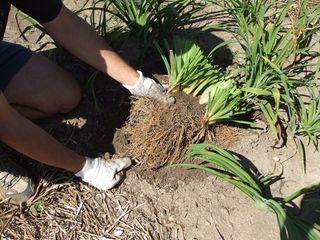
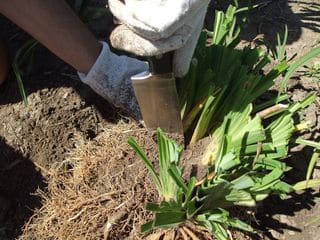
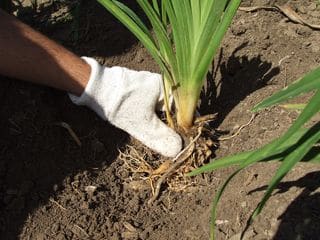
Step 6. Take a close look at the growths. Determine how many divisions you want to make. Place the knife or any sharp object at the division point and go ahead! Once again, you should wear appropriate safety gloves and closed-toe footwear.
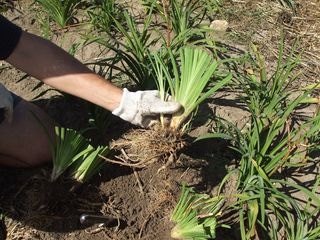
Step 7. In a gentle way, separate the growths, paying attention not to break desirable roots.

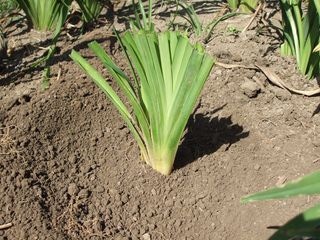
Step 8. Here’s the division ready for planting.
Step 9. Dig a hole, much bigger than needed. That way, you’ll make sure the soil is loosen up around the area where the division will be planted, allowing for a better aeration of the ground and water penetration.
Step 10. Once the hole has been dug up, you can amend the soil if you’re dealing with poor soil conditions.
Step 11. Place the division upright, spreading the roots in all directions.
Step 12. Cover up the white parts of the leaves, leaving the crown exposed to prevent crown rot (when water sits in there for too long when planted too deep). We like to make a little crater around the division, allowing water to be channeled there. We also like to mulch heavily (for water retention, weed prevention and winter protection).
Tadam! You’ve increased your collection, are ready to create new beds and give divisions to friends/your local hemerocallis society!
Pollination Technique Simplified
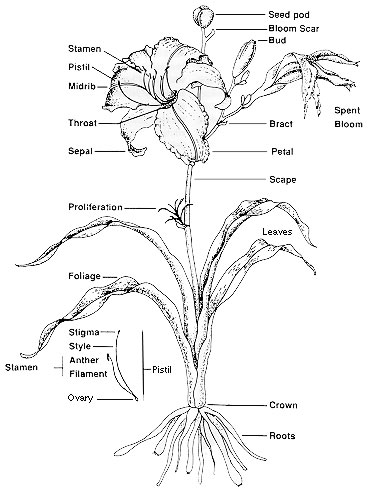
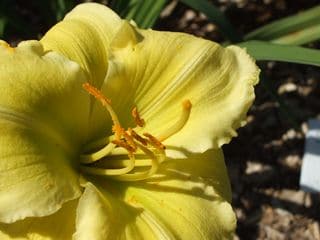
To get started, take a look at this image taken from the AHS site, describing the different parts of the plant and the flower.
You should also read quickly about chromosome count. Diploids can only be crossed with diploids, tetraploids with tetraploids.
Chose the plants you want to hybridize with. Besides the obvious colour scheme, you should take into consideration hardiness, growth habit, growth rate, reblooming capabilities and bud count. Slow division rate plants are usually discarded, unless they have an amazing feature that should be passed along to its progeny.
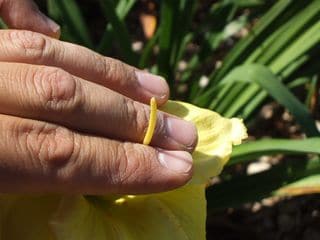
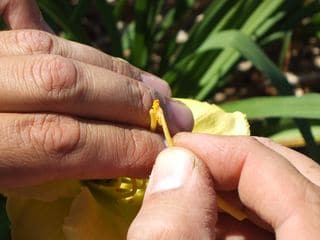
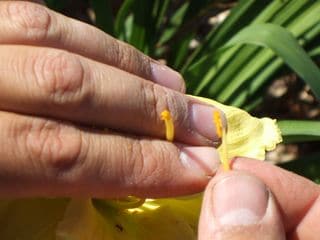
Here are the simplified steps of pollination:
Step 1. Remove the stamen from the plant you want to use as a male parent.
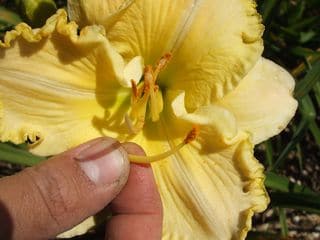
Step 2. Isolate the pistil of the plant you want to pollinate and use as a female parent, the one that will produce the seed pod.
Step 3. Rub the pollen on the tip of the receptive pistil.
Step 4. Make sure there is enough pollen on the pistil.
Step 5. Pollination accomplished!
Step 6. Keep track of the pollen parent used (since you’ll know who the pod parent is) and the date of pollination.
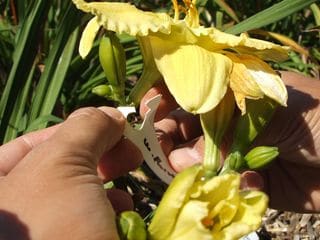
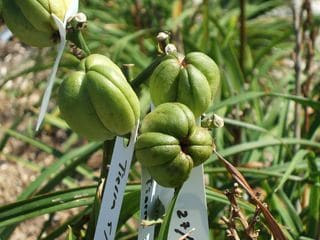
Step 7. Watch the seed pods swell. It should take about 5 weeks for them to mature. Once they are mature, they’ll split open. Collect the black and plump seeds and let them dry up for a day or so. Place in fridge for a good month (stratification technique). Make sure to keep good records of the seeds and parents used!
We will get back to you with more steps on how to sow the seeds.
If you fast-forward a bit, here are a few seedlings, grown in our greenhouse. They’re in relatively low-light conditions, since it’s quite cloudy up here at the farm. However, they’ll pick up speed as the days get longer and the sun gets stronger.
Once again, make sure to properly label your pots. We like writing on a tag AND on the pot. That way, if a squirrel or any other critter (including kids!!!) remove the label, you’ll have a way of knowing who’s who!


